I think you may feel upset when your Web Part got error message like "Unexpected error". I found some info about how to enable debugging. However I never tried it yet. Someone told me that it's theorically fine, but not many people do it. Normally, it's practically okay when try with the computer that set server and client in 1 machine.
This is the instruction to
These are where I got the info from..
http://msdn2.microsoft.com/en-us/library/e8z01xdh(VS.80).aspx
http://blogs.msdn.com/pranab/archive/2007/07/04/how-to-implement-debug-option-in-sharepoint-application-within-vs-2005-with-complete-call-stack-instead-of-custom-error-page.aspx

Thursday, August 30, 2007
Let's Talk about .. Excel 2007-Simple Drop Down List
This is the instruction to create the Simple Drop Down List.
- Go to Data -> Data Validation -> Data Validation.

- Inside the Data Validation, in Settings tab, set allow to List.

- Specify the source. For example, I have these list.
- Click OK.
- Then, I got the Drop Down List.


Friday, August 24, 2007
Let's talk about .. SharePoint Designer 2007-Body Area Style
The Styles in core.css that relate with the frame of Body Area are
- .ms-bodyareapagemargin
- .ms-bodyareaframe,.ms-viewareaframe
- .ms-bodyareaframe
Let's talk about MOSS2007-How to get GUID
If you want to know the Guid of your Document Library or List, you can try by this one.
// get current web(site)
SPWeb web = SPContext.Current.Web;
// get current list or library
SPList List = web.Lists[DocumentName];
// get all item in list or library
SPListItemCollection items = List.Items;
// NATT will store Guid.
Guid NATT;
NATT = new Guid();
NATT = List.ID.ToString();
NOTE: the definition of DocumentName is....
private string _documentName = "DocLib_or_List_Name";
[
Personalizable(PersonalizationScope.User),
WebBrowsable(),
WebDisplayName("Documents Library Name"),
WebDescription("Documents Library Name")
]
public string DocumentName
{
set { _documentName = value; }
get { return _documentName; }
}
Let's Talk about .. Outlook 2007-Language Encoding
When you got e-mail which was not written in English, you may got some problems since the message was shown in other language. Yeah, you'd select the suitable encoding for your message. And for the 2007 version of Outlook, you can set the encoding by going to Other Actions->Encoding->More->"Your_Message_Language".
Let's Talk about .. SharePoint Designer 2007-Breadcrumb
Breadcrumb or the navigation is used to make the users know the track they are. They can go back by clicking where they want to go.
It is also set the style by the StyleSheet. You can modify it via the following styles.
It is also set the style by the StyleSheet. You can modify it via the following styles.
- .ms-pagebreadcrumb
- .ms-pagebreadcrumb,.ms-pagebreadcrumb a
Then, you can modify the padding, border, font-size, background, and text-decoration.
Thursday, August 23, 2007
Let's talk about .. MOSS2007-Approval Status
This is the way to enable the Approval Status for the Document Library.
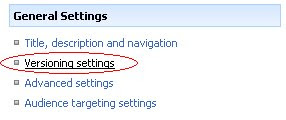
1. Enter Site Setting.
2. Go to Site Administration>Site libraries and lists.
3. Click at Customize "Your document library/list".
4. Go to General Setting>Versioning settings.
5. Set Content Approval as "Yes".
6. Set Document Version History as "No versioning".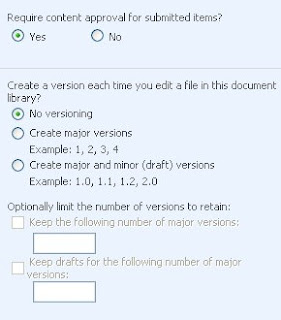
7. Set Draft Item Security as "items (and the author of the item) ".
8. Set Require Check Out as "No".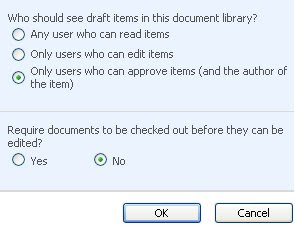
9. Click OK Button
10. The Approval Status appears.
11. Now there is Approve/reject inside the menu when you click at the down-arrow at the right of each item.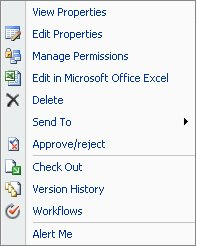
^_^ Enjoy your Approval Status ^_^
Wednesday, August 22, 2007
Let's talk about .. MOSS2007-SPListItem
If you're creating the Custom Web Part and using C#.NET, you should know SPListItem.
When you want to show the information of each item from the Document Library, we normally use the foreach-loop. I know some of the following variables from senior colleague. I think they are necessary things to know.
SPWeb web = SPContext.Current.Web;
SPList List = web.Lists[Doc_Lib_Name];
SPListItemCollection items = List.Items;
foreach (SPListItem item in items)
{
// Display File Name.
writer.Write(item.DisplayName);
// Display Document ID.
writer.Write(item.ID);
// Display Metadata Column.
writer.Write(item["Column_Name"].ToString());
// Write Metadata Column.
item["Column_Name"] = "NaTT.biz";
item.Update();
// Compare String with Metadata Column.
String.Compare( (string) item["Column_Name"],"NaTT.biz");
// Display url of item.
writer.Write(web.Url + "/" + item.Url);
}
Wednesday, August 15, 2007
Let's Talk about .. SharePoint Designer 2007-Web Part Border Line
Today I was ordered to change the color of the Web Part's border line. I took about 2 hours to find which style is involving with the border >_< Finally, I found that the Styles in core.css that have the relation with the Border line of Web Part consist of .ms-partline, .ms-WPBorder, and .ms-WPBorderBorderOnly.

- .ms-partline is the properties of the line between the content of Web Part and the link to add something to that Web Part.
- .ms-WPBorder and .ms-WPBorderBorderOnly are the properties of the lines of Web Part.
Friday, August 10, 2007
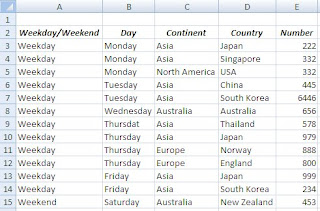
Let's Talk about .. Excel 2007-Pivot Table
Pivot Table is a powerful summation tool that is used to analyse. It's very essential thing but easy to create and use. I will show you how easy to create it is
- I create the excel table as the example as shown in this figure.
- Then, I select the cell that I want to create the Pivot Table for example, G2.
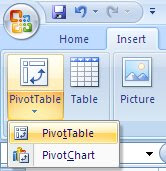
- Go to Insert tab->PivotTable->PivotTable.
- The CreatePivotTable window appears, then you select all the cells of your information that you want to create the Pivot Table. Then, the Range shows in the textbox. Moreover, you can select the Table if you're already name your table.
- Click OK.
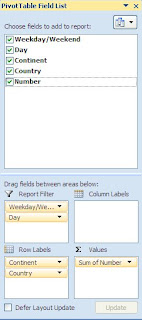
- The PivotTable Field List appears in the right zone. You can drag the fields into the below bottom which are Report Filter, Column Labels, Row Labels, Values. You can manage your Pivot Table to make it useful for your analysis. I managed my Pivot Table as shown in the following figure.
- Then, I got my Pivot Table.

Wednesday, August 8, 2007
Let's talk about .. MOSS2007-Adding Custom Web Parts
If the webparts that are prepared by MOSS cannot satisfy your requirement, the Custom Web Part will be your solution.
These are Five Benchmarks of Custom Web Parts (From Developer's Guide to Windows SharePoint Services 3.0 ).
1. Compiled : All Web Parts are encapsulated in a compiled DLL
2. Signed : They're signed web part assemblies.
3. Marked as Safe : WSS 3.0 Web app. run only when it's
4. Trusted : WSS 3.0 leverages the Code Access Security (CAS) as same as WSS 2.0
5. Deployed : The Web Part must be on the right place on every Web server in the WSS 3.0 farm.
After you finish creating Custom Web Part, the following steps are used to add your new Custom Web Part into the Web Part Gallery.
- Copy your .dll file to C:\Inetpub\wwwroot\wss\VirtualDirectories\[Your_HostHeader+Your Port]\bin\
- Open web.config of your MOSS server. (It's mostly at C:\Inetpub\wwwroot\wss\VirtualDirectories\[Your_HostHeader+Your Port]\)
- Add new SafeControl of your Web Part in web.config.
Tag: SafeControl
Attribute: Assembly="Your_Web_Part_Assembly_Name, Version=Your_Version, Culture=neutral, PublicKeyToken=Null" Namespace="Your_Namespace" TypeName="*" Safe="True"
Note: If you don't know the assembly name and namespace, you can use the Reflector program to view them. This program is a class browser program. The Reflector program can be downloaded at http://www.aisto.com/Roeder/ - Save web.config.
- Go to Site Setting in MOSS.
- Enter Gallery->Web Parts.
- In Web Part Gallery, click New.
- Select your Web Part. You can change your Web Part file name here if you want.

- Click the Populate button on top of the page.
- Finally, your new custom Web Part will be in the Web Part Gallery, so you can add your Web Part to your Web Part Page.
Tuesday, August 7, 2007
Let's Talk about .. Excel 2007-Synchronizing Tables with MOSS Lists
If you've ever used Excel 2003, you can connect to MOSS, both to read and write the list. But for Excel 2007 you may found that it can not do it directly. One of the methods is to do via Access 2007. I think because Microsoft recommended to use Access as the platform to connect to SharePoint. So you can transfer your Excel table to Access first, then use Access to update the list of SharePoint.
Anyway, there is the add-in from Microsoft to make your Excel 2007 be able to synchronize with MOSS. You can download the add-in from Microsoft at this link.
http://www.microsoft.com/downloads/details.aspx?familyid=25836e52-1892-4e17-ac08-5df13cfc5295&displaylang=en
The instruction to Add-in:-
Anyway, there is the add-in from Microsoft to make your Excel 2007 be able to synchronize with MOSS. You can download the add-in from Microsoft at this link.
http://www.microsoft.com/downloads/details.aspx?familyid=25836e52-1892-4e17-ac08-5df13cfc5295&displaylang=en
The instruction to Add-in:-
- Go to Excel Options.

- Add-Ins-> Go.

- In the Add-Ins window, click Browse.

- Select your add-in.
- Click OK.
Monday, August 6, 2007
Let's Talk about .. MOSS2007-Target Audience
You can target the group of audiences in MOSS2007 (I just tried today). In MOSS2007, you can specify which group can see each item in the navigation menu. This is the simple instruction.
- Enter the Site Settings->Navigation.
- In the Site Navigation Setting, scroll down to Navigation Editing and Sorting.
- Click at Head or Link you want to make target group for.
- The Web Page Dialog appears, then click at the book icon.

- Select the audience you want to target.
PS. You can create new group of audience if you have the right to do.
I also tried the case of one user in 2 groups of audience. The result is showing all items that both groups have been targeted.
Sunday, August 5, 2007
Let's Talk about .. Windows Live Messenger-Show Song Name
Showing the song name you're listening is one of the ways to make your friends know more about you. Windows Live Messenger or the new version of MSN Messenger has the same function as the previous version that you can show the name and artist name of the song you're listening via Windows Media Player. You can show song info by the following steps:-

- Open Windows Media Player.
- Go to Tools->Plug-ins
- Click Windows Live Messenger Music Plugin.
NOTE: if you don't have this plugin, you can download it from internet by click at download plug-ins. - Open Windows Live Messenger.
- Go to Tools->Options.

- Select Personal, then set "Show song information from Windows Media Player as a personal message".

- Finally, your personal message shows the name and artist name of the song.

Anyway, it depends on the properties that are set with the song file. You can change it by changing the its property. First, right-click at the song file. Second, select Properties. Third, select Summary tab. Forth, select Advanced>>. Forth, type the info.
Wednesday, August 1, 2007
Let's Talk about .. MOSS2007-Flyout Navigation Bar
Creating a flyout nevigation bar is easy in MOSS2007. Even I took about one week to do it >_<
First, you should enter the "Site Setting". Since the nevigation bar is already prepared by MOSS, you just create new or edit the exist one. Then, you got the left nevigation bar.
Second, if you are ok with the default navigation bar, that's it. Anyway, you can modify to change its style or make it be flyout by opening SharePoint Designer, the new version of Front Page.
Third, open the master page, then see the code of the navigation bar. To make it be flyout, you just set the following attributes in thetag:-
First, you should enter the "Site Setting". Since the nevigation bar is already prepared by MOSS, you just create new or edit the exist one. Then, you got the left nevigation bar.
Second, if you are ok with the default navigation bar, that's it. Anyway, you can modify to change its style or make it be flyout by opening SharePoint Designer, the new version of Front Page.
Third, open the master page, then see the code of the navigation bar. To make it be flyout, you just set the following attributes in the
Forth, if you want to change the style, you can change the styles of
- LevelMenuItemStyles tag
If you got any problems, I recommend you this blog. It's very helpful for me when I first tried to make it since there is the simple step-by-step instruction to make it.
Fifth, after you can change the style of the main bar of the navigation bar, if you want to change the style of the flyout of the bar, you can do it by adding the following tags:-
These tags are located inside . YourStyle1, YourStyle2, YourStyle3 are the names of the style you use.
Enjoy your Navigation bar !!
Subscribe to:
Posts (Atom)